06 February 2007

I Would Like to Join a Mandoline Support Group.

Cole slaw that would have been made in half the time had I
been able to use my mandolin correctly.


Is there a mandoline support group out there somewhere? A forum for clumsies like me who cannot figure out how to use their new (and expensive) mandolins?
If so, I would very much like to join.e

A few weeks ago I bought a shiny, new mandoline that I was so excited to use. All day long at work, I daydreamed of coming home and slicing cabbage into little, thin pieces. I counted the hours until I could effortlessly slice away in my kitchen, watching delicate, slender strips whirl off the blades and into neat little piles on my counter.
Alas, disaster struck. Instead of producing beautiful and elegant slivers, the mandoline tore the leaves into huge, sloppy chunks, violently destroying the cabbage as well as my hopes and dreams.

In a fit of frustration, I hurled the cabbage mess onto the floor and stomped off to the computer to do some online research. I googled “mandoline directions.” No good. I googled “using a mandoline to slice cabbage.” Nothing. I even googled "mandoline retard" in hope that there was someone out there like me who could help. No success.
Disgruntled, I returned to the kitchen and glared at the mandoline and felt a little bit better when I saw how how ugly it looked with all that ruined food stuck between its teeth. But then I saw the box, and I became enraged again. The OXO box has a beautiful picture of red cabbage, all cut up into tiny, little pieces. Now I know for sure you should be able to slice cabbage on a mandoline!

OXO, you misled me. I bet you used a knife to cut that cabbage, didn't you? That’s what we had to do. My dinner guest got stuck doing it, because I was so exasperated by the entire experience. She did a great job slicing that cabbage the old-fashioned way. The knife worked great, OXO. But I was hoping the mandoline would work great, too.

So if anyone knows of a website that shows people in great detail how to slice cabbage on a mandoline, I would be eternally grateful for that knowledge.

In return, I offer you a tasty cole slaw recipe. Ewwwww…..cole slaw? Wait!
Before you say ewwwwww…..coleslaw again, hear me out. This isn’t real cole slaw! It does not have mayonnaise in it!
No mayonnaise, joy of joys! Instead, the dressing is a mixture of peanut butter, soy sauce, and other ingredients often found in Asian dishes. I would so much rather eat rice wine vinegar than mayonnaise.

I served this cole slaw with a beef and broccoli stir fry, but I see no reason why it can't accompany any meal that you would serve traditional cole slaw with.


Cole Slaw with Asian Flavors
~from All Recipes
~Note: This makes a lot of salad. If you would like the eat it the next day, split the vegetables in half and only add the dressing to half of the salad. Store the other half of the dressing separately, then combine when you are ready to eat. Otherwise, the dressing makes the cabbage go soggy overnight.

Ingredients:
* 6 tablespoons rice wine vinegar
* 6 tablespoons vegetable oil
* 5 tablespoons creamy peanut butter
* 3 tablespoons soy sauce
* 3 tablespoons brown sugar
* 2 tablespoons minced fresh ginger root
* 1 1/2 tablespoons minced garlic

* 5 cups thinly sliced green cabbage
* 2 cups thinly sliced red cabbage
* 2 cups shredded napa cabbage
* 2 red bell peppers, thinly sliced
* 2 carrots, julienned
* 6 green onions, chopped
* 1/2 cup chopped fresh cilantro

Directions:
First, make the dressing. In a medium bowl, whisk together the rice vinegar, oil, peanut butter, soy sauce, brown sugar, ginger, and garlic.

In a large bowl, mix the rest of the ingredients. Toss with the dressing just before serving.

04 February 2007

I Promise This is My Last Taco Post Ever.


After writing about a few delicious tacos I enjoyed in Guadalajara and Chicago, I should probably be finished with the taco topic and ready to move on to something else.
No! I can’t move on! One more taco post!
Maybe after today I’ll give it a rest.

It’s just that I can’t ever really stop thinking about tacos. In one bite, I have everything in my mouth that I could ever possibly need in life...a piece of corn tortilla, a morsel of flavorful meat, a slice of avocado, a crumble of queso fresco, a burst of cilantro...put a taco in front of my face, and all other worldly matters disappear as the taco becomes my entire universe.

It has become apparent to me that I am prone to exaggeration when it comes to tacos. I’m sorry, but I will make no apologies for my obsession.
Um...you can be sorry for not being sorry, right?

In any case, I do apologize for constantly raving about tacos when there are many people who don’t have access to a good taco joint. Especially one that serves tacos al pastor. If that is you, your worries are over. Fancy Toast offers you a delicious taco recipe that you can prepare in your own home. Sadly, this recipe is not for tacos al pastor. But happily, the deliciousness of these tacos might almost surpass that of tacos al pastor. Thank goodness, because how many people do you know who own their own taco al pastor roasting spit?

My friend Abbey and I created this recipe when we were preparing our New Year’s Feast. Actually, it was mostly Abbey who was the mastermind behind the deliciousness. The only contribution I can take credit for is the addition of alcohol and sugar. Are you surprised about that?

The meat was simmered in a bath of blended guajillo chiles, onions, and tequila until it became fork tender. After we shredded the meat, we added sugar and lime juice, and then (poof!) the magic ensued! There are no words for the utterly delightful flavors of that meat. I say ‘flavors’ in the plural form because there was such a depth of flavors that my tastebuds could not decide what to focus on. Sweet, spicy, salty, smokey...there was even a bitterness from the the chiles that was quite lovely.

I am at a loss to describe the taste of this taco meat. I think that maybe even Rick Bayless might be at a loss for words, and I don’t know if that man is ever at a loss for words. Sorry Rick Bayless, that was mean. I love you Rick Bayless. You have changed my life. Abbey and I could never have created this recipe without all the knowledge you have imparted to us.


Abbey’s Tacos
~Serves 12

Ingredients:
12 dried guajillo or ancho chiles
3 onions, roughly chopped
4-5 garlic cloves
1/2 cup tequila
1/2 cup lime juice, divided
salt
2 lbs. meat of your choice (pork shoulder or loin is delicious, but I have also successfully used chicken breast and thighs)
6 cups chicken broth
1/4 cup cane sugar (white or brown sugar will also work)

Directions:
Over high heat in a large pot, toast the chiles for about thirty seconds on each side until they turn lighter in color. Do not allow them to burn.

Once cool, cut off the stems and scrape out the seeds.
Put chiles in a bowl of hot water and soak for 10-15 minutes. It helps to put a plate over the chiles so that they are completely submerged. Reserve one cup of the soaking liquid.

In a blender, pulse the onions, garlic, chiles, and 1 cup of the reserved soaking liquid. Do not purée.
The mixture should reach a slightly chunky consistency.

Heat a tablespoon of oil in the pot. Add the contents of the blender, the tequila, one tablespoon of salt, and 1/4 cup lime juice. Cook for five minutes.
Add the meat. If you are using a large chunk of meat, you can dump it in there in one piece, or cut it into two or three smaller pieces.
Add enough chicken broth so that the meat is mostly submerged. You might not use all six cups of broth.
Bring to a boil, then reduce the heat and simmer, covered, until the meat is fork-tender. Depending on the type and cut of meat, this can take between 40-90 minutes.

Remove meat and allow to cool. Using two forks or your fingers, shred the meat into bite-sized pieces.
Meanwhile, tend to the sauce. If it is watery, increase the heat to let some of the liquid evaporate. This might take anywhere from 5 to 20 minutes.
Now the magic happens. Taste the sauce. Bitter, isn’t it?
Add sugar and stir. Taste again. Completely different! Somehow the sugar brings out other flavors that you couldn’t taste under the bitterness.
Add salt and lime juice to taste.
Add the shredded meat.

Spoon the meat onto a warm tortilla. Add as many other garnishes as you like, such as crumbled queso fresco, chopped onions, cilantro, avocado slices, radishes, beans, tomatoes, etc.

Notes:
This makes alot of taco meat. It freezes well, so make it all and then use it later!
This meat can also be used as fillings for other Mexican dishes: tamales, enchiladas, tostadas, etc.

28 January 2007

Gin in the Morning


I swear I do not have a drinking problem.
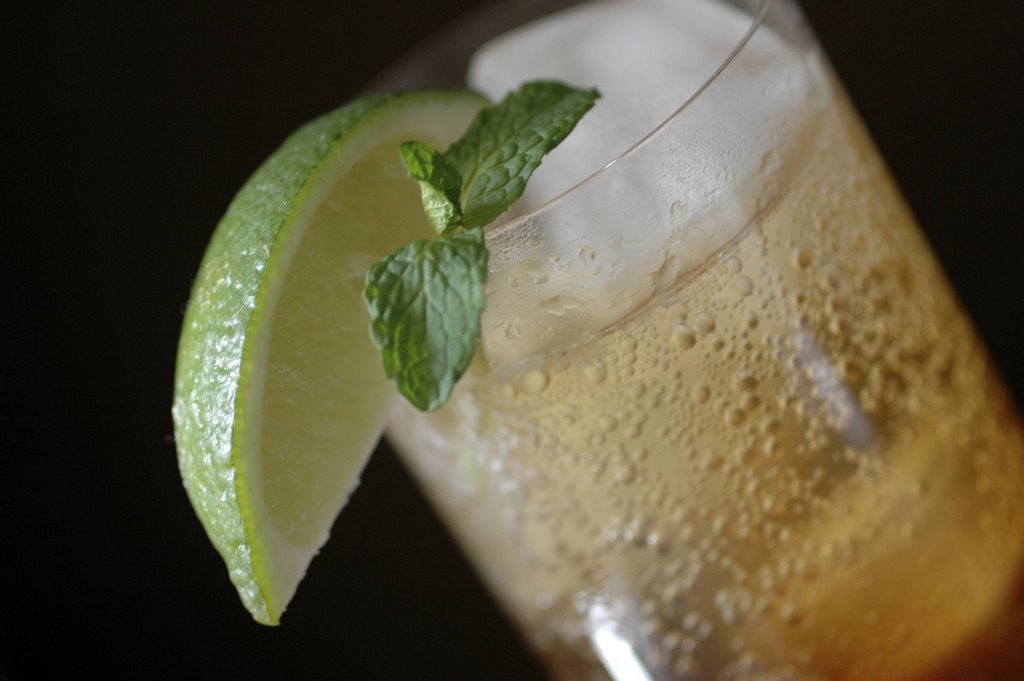
Just because this cocktail was made at 10:30 in the morning, does not mean that I am an alcoholic. The only reason this drink was made so early is because there is good lighting at 10 in the morning.
You might say, well, why don’t you wait until three o’clock in the afternoon? The lighting is still good then, and at least it’s the afternoon, a more reasonable time of the day to start drinking.
My answer to that sensible question is that at 3 o’clock today, I am going to be in my car driving. Would you rather that I drink this cocktail while I am driving?
No, I didn’t think so.

So. Then we have established that drinking at home in the morning is better than drinking on the road in the afternoon. Now that you are convinced that it’s okay to make a drink at 10:30 in the morning, let’s talk about the drink itself, instead of my drinking problem (which doesn’t exist, I swear).
In my mind, this cocktail was going to be ruby red, shimmering in the candlelight as I handed glasses to my guests as they walked in the door last night. In real life, however, the drink turned out light brown and shimmering in florescent light, because when my guests arrived, I was still cooking the soup and we ended up chatting under the stove light instead of by candlelight.
Big whoop. The drink might not have looked the way I hoped it would, but it tasted better than I ever imagined! Besides, pomegranates are so trendy these days- everyone expects a pomegranate drink to be red. So predictable! When a drink is supposed to be red, but it turns out brown, it keeps people thinking. But not thinking hard enough that they won’t sip it delightfully and exclaim how deliciously sweet and and tangy and bubbly it is.

Now, the question is, am I going to drink this cocktail when I am finished taking photos of it?
You bet I am. There’s actually not any gin in this one. I finished the bottle last night. Oops. Maybe I do have a problem.

Bubbly Pomegranate and Gin Cocktail - Delicious!
-adapted from various recipes on the internets

You can adjust the proportions to your taste. I ended up squeezing the lime garnish into the drink to make it a little less sweet.
2 parts jin*
1 part lime juice
1 part simple syrup
1/2 part pomegranate molasses (I found this in the baking aisle at Whole Foods...cheaper than pomegranate juice, and a little goes a long way)
2 sprigs of mint (bruised or torn into small pieces)
Club soda or seltzer water

In a shaker or with a stirrer, mix the first five ingredients with ice.
Pour into a glass that is filled with ice. Top with club soda.
Garnish with lime and mint.

*I misspelled gin on purpose so you would think I already had a few this morning. Gotcha.

bubbles!

24 January 2007

Using Macaroni to Cultivate Awesomeness in Your Children


When I have children, I am going to make this macaroni and cheese for them. But I’m going to make it real spicy so they can’t eat alot of it, and then there will be more for me and my husband.
Just to be nice, though, sometimes I’ll make it less spicy, and the kids will love it and crave it and beg me to make it, and then I will easily be able to get them to do things, like chores, homework, and my taxes. No macaroni and cheese for you until you do this and this and this.

The constant and obsessive hope for a nibble of this macaroni and cheese will hold the ultimate power over my children’s behavior. If they do their homework, it won’t be because they want to be smart, it will be because they know that if they get A’s, I will make this macaroni and cheese for them. If they practice the piano, it won’t be because of the inherent joy they find in making music, it will be because they know that for every Ligeti etude they master, there will be a plate of macaroni and cheese waiting for them when they get home from the recital. And if they turn out awesome all around, it won’t be because of awesome genes, or deluxe parenting skills, it will only because they want to be awesome for the sake of the macaroni.


Now, I know that you are not supposed to give children rewards for every little thing they do. It’s better to cultivate a healthy sense of intrinsic motivation, so your kids will do well for the sake of doing well, and not so they get stuff when they do well. Well, I used to agree with that perspective until I had this macaroni and cheese. Now it is clear to me that there is nothing wrong with extrinsic motivation, and I plan to use it accordingly to manipulate my children into turning out awesome.

I will say to my kids, “Hey kids, if you suck at anything, you don’t get any Bon Appétit macaroni. You just get Annie’s macaroni.” Annie’s is great, don’t get me wrong, but there are a lot of ‘great’ kids out there that don’t turn out to be anything special when they grow up. So don’t feed your kids Annie’s, unless you want them to turn out boring. Feed them Bon Appétit macaroni and cheese, and they will try harder to be awesome in general.


Macaroni and Cheese with Buffalo Chicken
~Bon Appétit Magazine, February 2007

For the Chicken:
2 1/4 cups all purpose flour
1 1/2 tablespoons cayenne pepper
1 1/2 tablespoons paprika
1 1/2 tablespoons salt
1 1/2 tablespoons ground cumin
1 1/2 tablespoons ground coriander
2 cups whole milk
3 large eggs, beaten to blend
4 cups cornflakes, ground to crumbs in processor
1 pound chicken cutlets, cut crosswise into 1-inch-wide strips

Canola oil (for deep-frying)

Macaroni
1 pound small elbow macaroni
2 cups chopped green onions (about 8 large)
2 tablespoons chopped fresh oregano
8 tablespoons (1 stick) butter, divided
3 cups chopped onions
2 large garlic cloves, chopped
1/2 cup all purpose flour
4 cups whole milk
1 pound extra-sharp cheddar cheese, coarsely grated
8 ounces provolone cheese, coarsely grated (I used monterey jack)
2 teaspoons paprika
1 teaspoon salt
1 teaspoon freshly ground black pepper

1 cup hot pepper sauce (be careful with this; I only used 1/4 cup and it was still very spicy)

For chicken:
Whisk first 6 ingredients in deep medium bowl to blend. Place milk in second bowl, eggs in third bowl, and ground cornflakes in fourth bowl. Working with 4 chicken strips at a time, place in flour mixture and toss to coat. Dip same chicken strips into milk, then eggs, then cornflake crumbs, coating with each; arrange on sheet of foil.

Pour oil into heavy medium saucepan to depth of 2 inches. Attach deep-fry thermometer to side of pan; heat oil to 335°F to 350°F. Working in batches, add coated chicken strips to hot oil and fry until golden and cooked through, turning occasionally, about 3 minutes. Using slotted spoon, transfer chicken strips to paper towels to drain. Cut strips into 1-inch-long pieces.

For macaroni:
Cook macaroni in large pot of boiling salted water until just tender but still firm to bite. Drain; transfer to very large bowl. Mix in green onions and oregano.

Melt 6 tablespoons butter in same large pot over medium heat. Add 3 cups chopped onions and garlic. Cover; sauté until onions are soft but not brown, stirring often, about 6 minutes. Add flour; stir 2 minutes. Gradually whisk in milk. Bring to boil, whisking constantly. Reduce heat and simmer sauce 2 minutes. Add all cheeses, paprika, 1 teaspoon salt, and 1 teaspoon pepper. Whisk until cheeses melt and sauce is smooth, about 2 minutes. Remove from heat. Season to taste with more salt and pepper, if desired. Mix cheese sauce into macaroni. Mix in chicken pieces. Mound mixture in 13x9x2-inch glass baking dish (I have used a baking dish for family style, and ramekins for single servings).

Preheat oven to 350°F. Stir hot pepper sauce and remaining 2 tablespoons butter in small saucepan over medium heat until butter melts; spoon 4 tablespoons over macaroni in dish. Bake macaroni uncovered until heated through, about 30 minutes, or 45 minutes if made ahead. Serve, passing remaining butter and hot-sauce mixture separately.

Makes 12 servings.

15 January 2007

One-Handed Dump Cake


Undoubtedly, there will be times when the trammels of everyday life prevent you from having enough time to make dessert. The leisure time in your day becomes lamentably overwhelmed by mundane, necessary activities that simply cannot be avoided, such as going to to work, doing actual work while you are at work, cleaning the bathroom, and practicing Journey covers on the viola (the last is a highly enjoyable activity, but it nevertheless detracts from my weekly allotted dessert-making time).

Despite these time-consuming tasks that manage to take up most of the day, dessert is occasionally a necessity that cannot be neglected. Unfortunately, sometimes you don’t even have four minutes with which to make a dessert, no matter how much your heart aches to be in the kitchen, cracking eggs, spilling flour, and gazing adoringly at your whirring KitchenAid.

To the ubiquitous human plight of not having enough time to make dessert, I present a solution to you: Dump Cake. The essence of dump cake lies in the efficient act of the Dumping of pantry ingredients that have an indefinite shelf life and can be ready for use at a moment’s notice. No shopping required, and as an added bonus, no stirring required! Whether you are in the midst of preparing a last-minute dinner party for friends you love, or slapping a dessert together for a potluck that you don’t really want to go to anyway, the process is the same. You simply dump the ingredients into a pan, spread them around, and stick the pan in the oven. Then you are done!

Dump cake fits busy schedules perfectly; its low-maintenance preparation allows you the convenience of doing two things at once, because you only need one hand to make dump cake. One hand does the dumping, while the other is left completely free to complete other necessary daily tasks that only require the use of one arm, such as:

feeding a fish
dribbling a basketball
holding a baby on your hip
doing shots of tequila
doing shots of tequila while holding a baby on your hip
playing “Iron Man” on the recorder (as long as you don’t start lower than ‘A’)
participating in a fencing tournament
picking your nose
picking your friend’s nose
signaling a right turn
playing tennis (only forehand strokes)
acting out Hamlet with finger puppets
practicing jazz hand
making a second dump cake


Admittedly, dump cake is not a a dessert of high caliber. It is not the sort of dessert that lends a feeling of accomplishment upon pulling it out of the oven and setting it down on the table at an elegant dinner party. There are other desserts that are more impressive, and there are other desserts that are more delicious. But- there are not many other desserts that taste this good that can be prepared in under four minutes. This cake really does taste good. The first time I read about it on the internet, I thought it was a joke. No stirring? Upon more googling, however, I found that dump cake is a guilty pleasure that many Americans take comfort in. So if you need a tasty dessert within the next hour, and you’re not trying to impress anyone, make dump cake. Your guests will love it, and if they don’t love it, they’ll at least like it, and they'll certainly be entertained when you tell them how it is made.

No stirring necessary; the cake mix absorbs the fruit juices
and transforms into a cobbler-like consistency.


Dump Cake
1 20 oz. can crushed pineapple
1 16 oz. can cherry pie filling
1 package yellow white cake mix
1 stick of butter, cut into thin slices (or just melt it if you’re really pressed for time)

Preheat oven to 350ºF.
Dump crushed pineapple and juices into a 13 x 9 inch baking pan.
Dump cherries.
Dump cake mix.
Dump butter slices (or drizzle the melted butter over top of the cake mix).
Bake for 30-50 minutes, until the top of the cake is golden-brown.
Serve as is, or with a scoop of vanilla ice cream.

Other variations include:
Omit the pineapple juice, use 2 cans of cherry pie filling, and use chocolate cake mix instead of yellow. Mmmmmm....that sounds delicious!
Or, sprinkle some sweetened, shredded coconut before you add the butter. You can also sprinkle chopped pecans before you add the butter.
Or, use apple pie filling and a mix for spice cake.
The options are endless!
Aren’t you so glad you know about dump cake now?

07 January 2007

Mexico!

In Guadalajara, Mexico, a man assembles a taco al pastor.

Ah, I distinctly remember my first street taco in Mexico. Already I am nostalgic for a moment that occurred only last week!

Allow me to reminisce.

Last week, my friends and my husband and I, joyous yet ravenous upon our arrival into the new country, stood in a dorky circle on a cobblestone street in Guadalajara. We smiled at each other through our tacos and joyfully proclaimed our meal’s magnificence in between sloppy bites of crispy al pastor goodness. Even though salsa was occasionally missing my mouth and splattering all over the sidewalk and my toes, I do believe that it was my favorite taco experience ever. When I am eighty years old and someone asks me to please list the top ten taco highlights of my life, there is no doubt that this one will remain my favorite taco experience for all eternity.

shaving pork from a spit for a delicious taco al pastor

When people travel abroad, they often learn things about themselves. One thing I learned about myself while I was in Mexico is that I would be perfectly happy if I could stay in Mexico for the rest of my life, but only on the condition that I could also eat eat a taco al pastor every single day of that life, and that the taco would have to be purchased from one of the many taco vendors that line Guadalajara’s streets and plazas. For my daily taco, I would like to watch the man above shave the pork off of a steaming spit, grill it into little, crispy, wonderful bits, shovel it into a soft, warm, corn tortilla, and smother it with onions, cilantro, and salsa.

garnishes for the wonderful tacos
(chopping block and various meats in the background)


I apologize for not having a picture of the glorious tacos themselves, but seriously, once you get one of those babies in your hands, there is no desire to take a pretty picture of it. There exists only the overwhelming urge to put it in your mouth. (For a picture of a similar-looking taco made at a restaurant in Chicago, see this post).


Taqueria de Los Faroles, one of our taco al pastor stops,
conveniently located across the street from the hotel.

If you ever have the chance to visit Mexico, be sure to shell out five pesos (a little less than fifty cents!) for a delightful taco al pastor, or five of them if you're hungry. It just might be your favorite meal of the entire trip.

a taco making a taco


Some other highlights of our visit, some food related and some not at all:

Metropolitan Cathedral in downtown Guadalajara


so many beautiful sights to take in while walking down the city streets!


Metropolitan Cathedral from a different angle


This is the inside of Mercado Libertad, an enormous three-story market with restaurants, produce, groceries, clothing, and many many many other items. There, I ate goat for the first time. You will not see a picture I took of the goat stew (called birria), because if you see the picture, you will probably never want to try goat meat ever. Fatty and bony, and lit by fluorescent lights, the birria did not look appetizing at all.
But it tasted wonderful!


maracas in the Mercado Libertad


piggies at the market

a pretty building I should know the name of but I don't but I don't care because it's pretty


Papel Picado (a Mexican art form of cutting paper) hanging in a courtyard in Tlaquepaque


A Huichol Indian woman selling her crafts in Tlaquepaque.


Street musician


Cobblestone streets


Tequila...mmmm..........


At the Jose Cuervo Factory in Tequila, these are piñas, the hearts of agave plants. They are waiting to be put into ovens, where their starches will be transformed into sugars. After steaming in the ovens for quite some time, the piñas are cooled, milled into small pieces, and pressed. The pressed juices are then fermented, distilled, and sometimes aged. We sampled tequila at each stage of the process, from the roasted piñas themselves to 100% tequila that had been aged in oak barrels.


an agave plant just outside of the town of Tequila


The church in the town center of Tequila (if you look closely, you can see a man on top of the church) .


Driving from Guadalajara towards the coast. What a beautiful country!


More driving. Not a bad view at all!


A beautiful morning at the Banderas Bay on the west coast of Mexico. I hope I can return
soon to this amazing country.